 Sign in to Mod The Sims
- Site Map >
- Modding and Creation >
- Sims 3 Creation >
- Modding Discussion >
- Importing .dff into Sims 3
- Site Map >
- Modding and Creation >
- Sims 3 Creation >
- Modding Discussion >
- Importing .dff into Sims 3
Replies: 17 (Who?), Viewed: 784 times.
#1
 27th Sep 2023 at 11:30 AM
27th Sep 2023 at 11:30 AM
Posts: 9
I am very unconcerned about importing the textures and everything from GTA as I am uninterested in keeping the Picadors original textures. However, I've been really stuck on UV Mapping the stupid infernal thing. I have always struggled with UV Mapping and find it to be one of the more tedious parts of 3D Modeling. Any help on where to go when dealing with an automobile, especially if it's from GTA, would help me a lot. I get the sinking feeling I may be putting a lot more work in than I need.
Advertisement
#2
27th Sep 2023 at 11:34 AM
27th Sep 2023 at 11:34 AM
Posts: 9
Quick follow up, a more general help if anyone knows, would also be a step by step of "how to import a model from a different game into The Sims 3"
#3
27th Sep 2023 at 10:41 PM
27th Sep 2023 at 10:41 PM
Posts: 484
Thanks: 10 in 2 Posts
If the mesh has existing UV maps (can't tell from the image because they only show in Edit Mode, but I imagine so), all that really matters is making sure they fit the ratio of the TS3 texture. Almost all of TS3's are square, but especially because this is a car I know there are exceptions to that rule. You can check the textures of whatever EA car you use as a base for an idea of whether it's going to be using 1024x1024 or 1024x2048 etc.
Otherwise, if you want to redo the UVs from scratch that's more of a topic to find Blender tutorials for than anything related to TS3.
My general rule of thumb is that if a mesh looks okay being converted to .obj, there is very little that differentiates it from any other mesh at that point- so wherever it came from doesn't really matter. Pretty much every existing object creation tutorial can be followed with an .obj.
You can use an EA object as reference for other details to mimic- such as what parts need to be separate mesh groups and what bone is assigned to them.
The main TS3 specific part is converting it into the appropriate format for the game when the mesh itself is complete.
For CAS items, that's GEOM- which have a great plugin for Blender. For objects, it's MLOD and MODL. The Blender plugins for these are very outdated, for a specific version of Blender only. I'm sure any tutorials that use them can still be followed, but I found that it can't load some specific EA objects.
On even older tutorials, you'll find that the program used was Milkshape in combination with TSRW (which uses its own .wso format).
Those are the methods that have the most documentation, which is usually what users are most comfortable with.
I personally do everything related to the mesh in my preferred version of Blender, export as .obj, and use Milkshape purely to turn it back into a format that can be imported directly into the package. That just isn't a method any existing tutorials cover (that I know of) so it's less useful to explain if one is already 90% into trying to do it with TSRW

#4
28th Sep 2023 at 5:54 AM
28th Sep 2023 at 5:54 AM
Posts: 9
Quote: Originally posted by CardinalSims
|
If the mesh has existing UV maps (can't tell from the image because they only show in Edit Mode, but I imagine so), all that really matters is making sure they fit the ratio of the TS3 texture. Almost all of TS3's are square, but especially because this is a car I know there are exceptions to that rule. You can check the textures of whatever EA car you use as a base for an idea of whether it's going to be using 1024x1024 or 1024x2048 etc. Otherwise, if you want to redo the UVs from scratch that's more of a topic to find Blender tutorials for than anything related to TS3. My general rule of thumb is that if a mesh looks okay being converted to .obj, there is very little that differentiates it from any other mesh at that point- so wherever it came from doesn't really matter. Pretty much every existing object creation tutorial can be followed with an .obj. You can use an EA object as reference for other details to mimic- such as what parts need to be separate mesh groups and what bone is assigned to them. The main TS3 specific part is converting it into the appropriate format for the game when the mesh itself is complete. For CAS items, that's GEOM- which have a great plugin for Blender. For objects, it's MLOD and MODL. The Blender plugins for these are very outdated, for a specific version of Blender only. I'm sure any tutorials that use them can still be followed, but I found that it can't load some specific EA objects. On even older tutorials, you'll find that the program used was Milkshape in combination with TSRW (which uses its own .wso format). Those are the methods that have the most documentation, which is usually what users are most comfortable with. I personally do everything related to the mesh in my preferred version of Blender, export as .obj, and use Milkshape purely to turn it back into a format that can be imported directly into the package. That just isn't a method any existing tutorials cover (that I know of) so it's less useful to explain if one is already 90% into trying to do it with TSRW
|
Oh wow thank you so so much! Yeah I saw a LOT of tutorials talking about Milkshape and many of them mentioning as a program thats /optional/ in place of Blender. But like you said, those tutorials were old, such is the case of modding a 15 year old game XP I really appreciate your advice! I'm the kinda person who for the most part can figure things out, but at times requires directional pointing or I'll get stuck in a loop :P
#5
28th Sep 2023 at 6:09 AM
28th Sep 2023 at 6:09 AM
Posts: 484
Thanks: 10 in 2 Posts
Object modding seems to have the oldest documentation of all the creation topics, like creators got sworn into secrecy or something 
If the old methods ever give you more grief, feel free to come back with more questions.
There are a couple users around here who know their way around TSR Workshop if that's the direction you go in, and I can fill in gaps on general Blender/S3PE/avoiding TSRW entirely

If the old methods ever give you more grief, feel free to come back with more questions.
There are a couple users around here who know their way around TSR Workshop if that's the direction you go in, and I can fill in gaps on general Blender/S3PE/avoiding TSRW entirely

#6
28th Sep 2023 at 6:36 AM
28th Sep 2023 at 6:36 AM
Posts: 9
Attatched is also the export settings I use when exporting my Mesh as an obj
(I'm open to using S3PE as well but I don't really know how to use that one)
#7
29th Sep 2023 at 3:25 AM
29th Sep 2023 at 3:25 AM
Posts: 484
Thanks: 10 in 2 Posts
Maybe @LadySmoks knows more about the TSRW issue? That program is not my strong suit, we'll see what she has to say.
I assume it's missing data of some sort, 'key' usually refers to resources being referenced. Did the tutorial you are following mention anything about replacing an EA mesh with your OBJ, and/or turning it into a .wso from there?
I'll take some screenshots of the import method I use in the meantime, so you have a backup to try if there's no luck.
#8
29th Sep 2023 at 3:55 AM
29th Sep 2023 at 3:55 AM
Posts: 9
Quote: Originally posted by CardinalSims
|
Maybe @LadySmoks knows more about the TSRW issue? That program is not my strong suit, we'll see what she has to say. I assume it's missing data of some sort, 'key' usually refers to resources being referenced. Did the tutorial you are following mention anything about replacing an EA mesh with your OBJ, and/or turning it into a .wso from there? I'll take some screenshots of the import method I use in the meantime, so you have a backup to try if there's no luck. |
Thank you so much for your help! You have honestly been the most helpful out of everywhere I've gone haha.
The tutorial I was using did tell me to import an OBJ to replace an EA mesh, apparently there was something about "grouping" I needed to do which I thought I did but the tutorial was a bit confusing about that part.
I have attatched an image of what my .blend file looks like right now
#9
29th Sep 2023 at 4:47 AM
29th Sep 2023 at 4:47 AM
Posts: 484
Thanks: 10 in 2 Posts
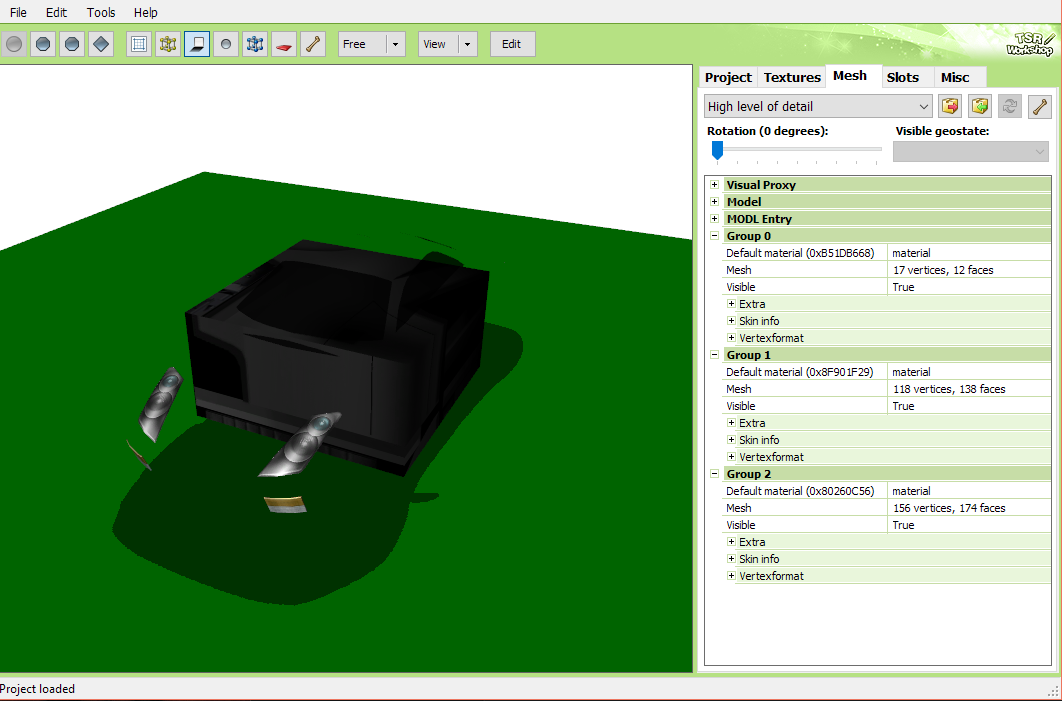
I think I might see what that tutorial is referring to- if you see in TSRW, the original car has Group 0, Group 1, Group 2. These refer to object groups rather than a literal 'group' in some of the other contexts that term might be used in Blender.
If you export the EA car as .obj and open that in Blender, you'll be able to see what is in each of those groups. 0 seems to be the main car from the number of faces, 1 and 2 will either be shadows or the windows so they can have the glass shader applied.
Once you combine/separate your new car mesh to be in the same kind of parts, they'll need to be renamed group_0, group_1, and group_2. I'd rename them both in Object Properties (orange square icon) and Object Data (green triangle icon) because I'm not sure which one TSRW will read it from.
Then you select all 3, export as .obj- the important options being 'selected only' and 'object groups'. TSRW should then be able to match the parts and import them in.
#10
29th Sep 2023 at 6:06 AM
29th Sep 2023 at 6:06 AM
Posts: 484
Thanks: 10 in 2 Posts
The alternate method, which is a little heavy on plugins to setup but otherwise lightweight in complexity:
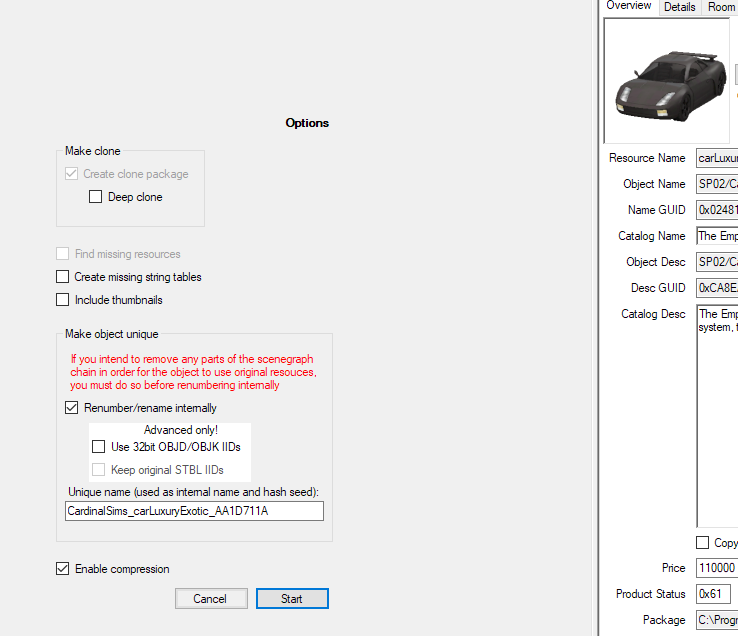
1. Clone a car in S3OC. I chose one from Fast Lane Stuff because in a recent thread it seemed like the consensus was that they're easier to work with than base game cars.
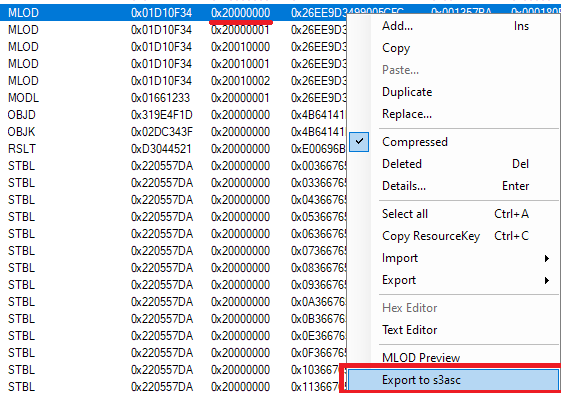
2. Open package in S3PE, find the MLOD with the group number that is primarily zeroes, right click and export it to s3asc.
You'll need the Mesh Helper plugin for this to be available. All of the groups will be exported at once.
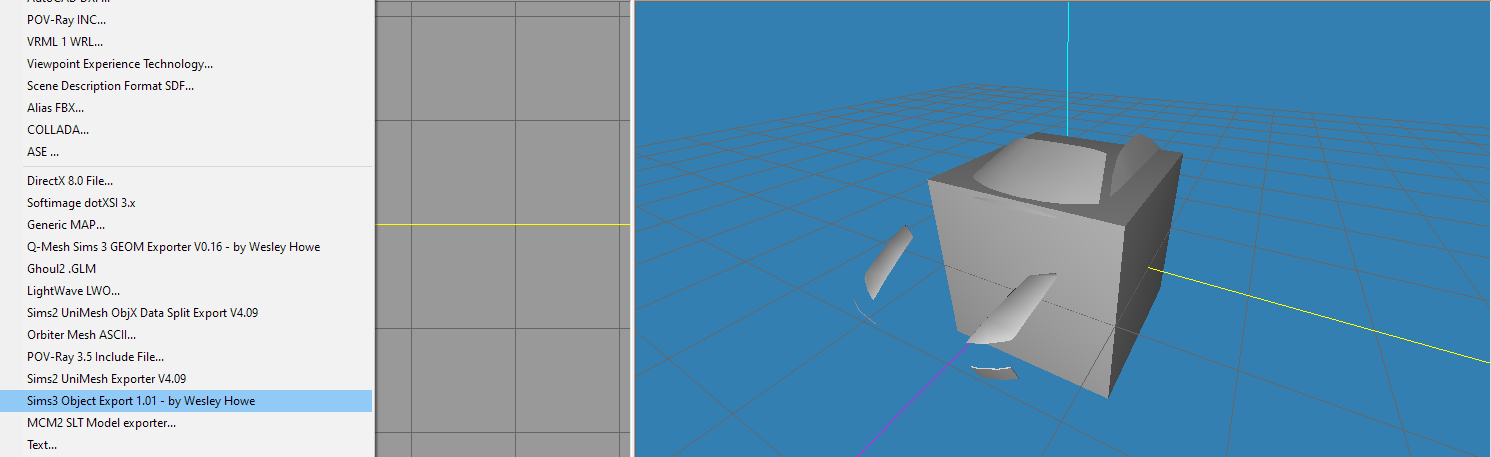
3. Open the exported file that ends with _filebase with Milkshape. I'm 90% sure even a trial version of Milkshape is fine for this, as the only purpose it will serve here is to convert a file- no need to save or load an actual project.

This requires another plugin- attached to this post, the one called msS3ObjPluginsV101. Drag and drop the contents of that download to the install folder of Milkshape.
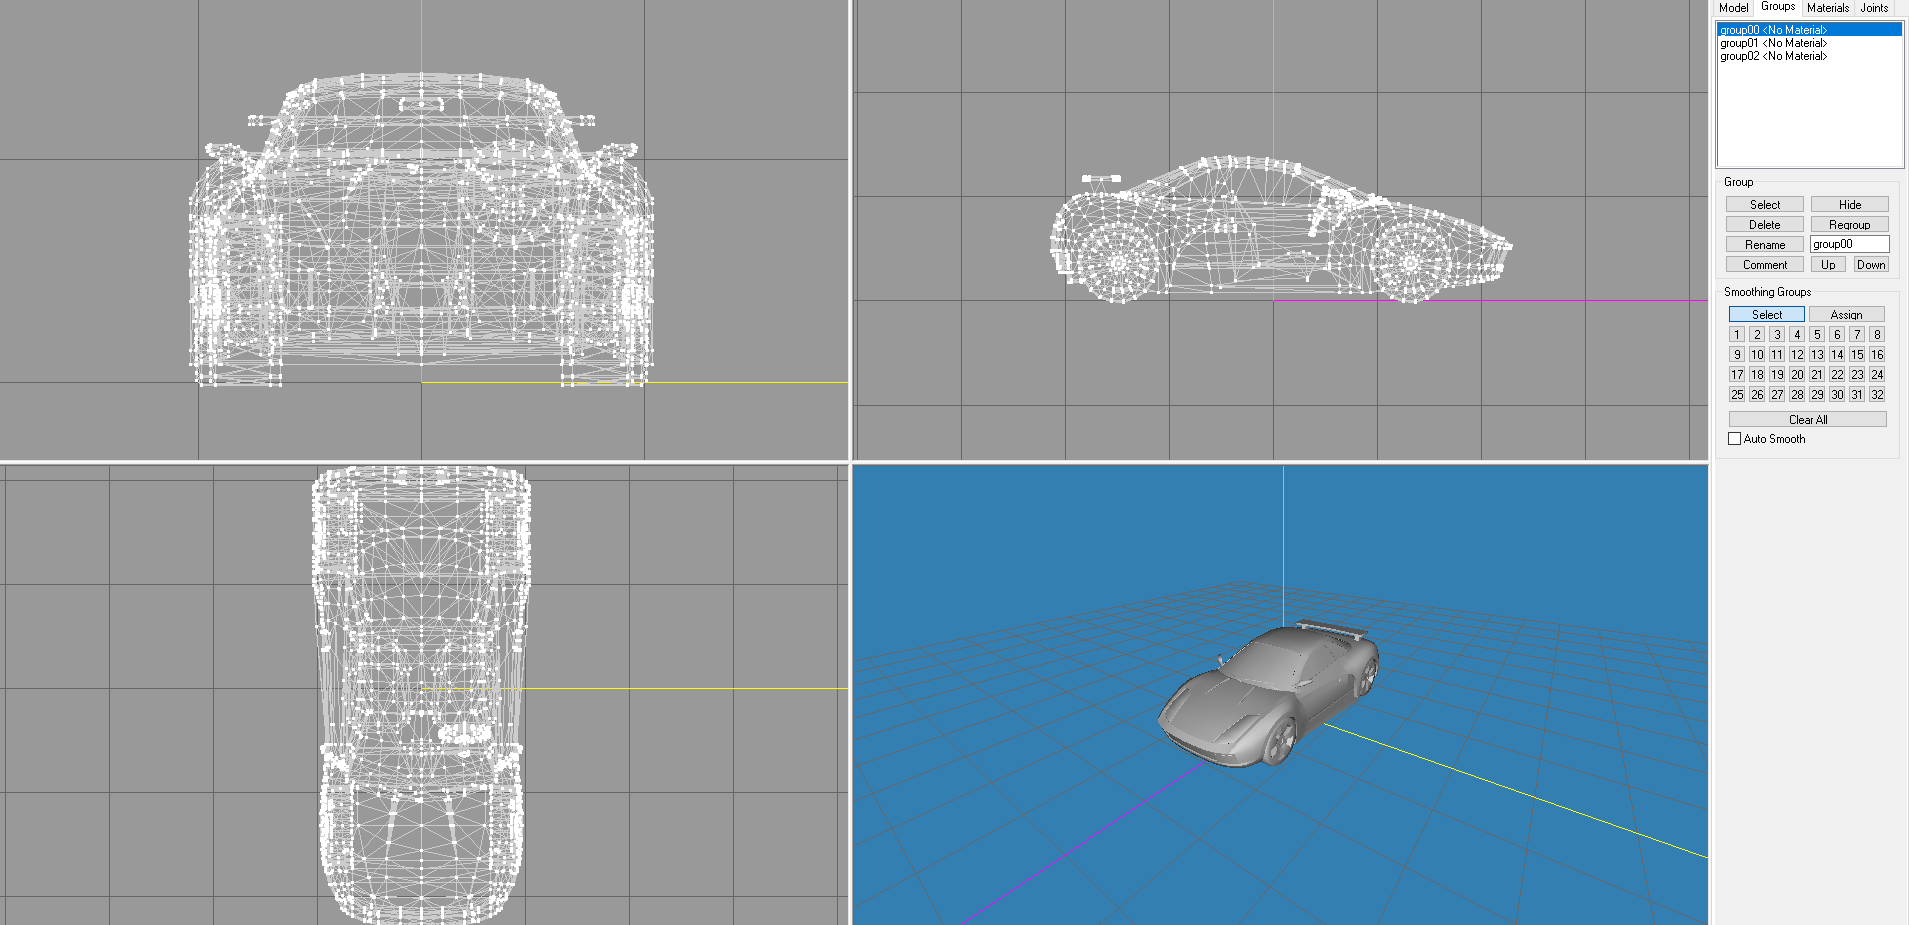
Now I can see that Group 0 is the body of the car, Group 1 are the glass parts, and Group 2 are the headlights by clicking Hide on each one (then again to unhide).
Import > Wavefront OBJ > select the mesh you made in Blender. For my purposes, I just exported the default cube for this.
4. In the Joints tab, you can check what bone assignments the original has. Click 'SelAssigned' to see where it's being used, then 'SelUnassigned' to deselect. The 4th one down was the regular object bone for the body of the car.
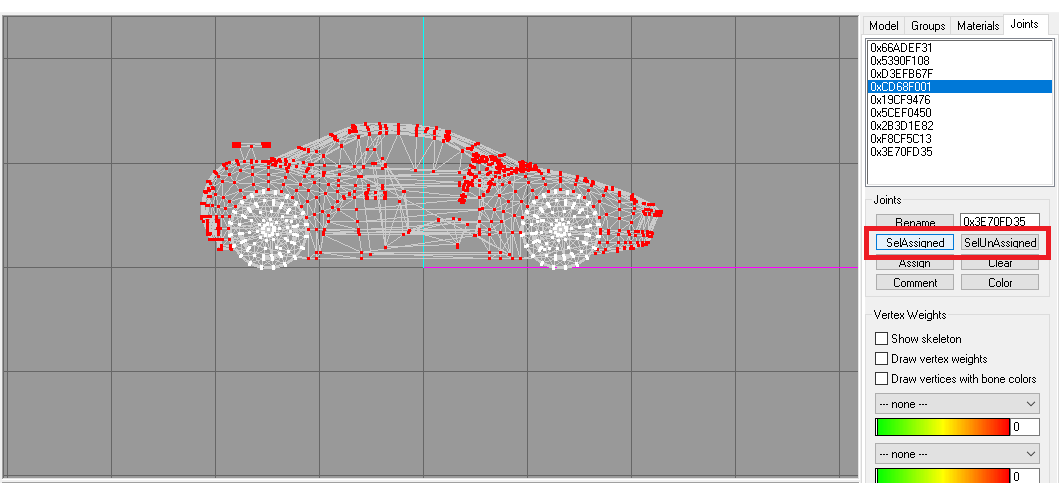
Then I can 'Select' my goofy cube, click that bone, then 'Assign'.
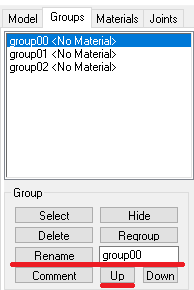
Then back in the Groups tab, delete the original 'group00', give that name to my cube, and move it up to where the original was. For your purposes, you can do these same steps to replace all 3 pieces with the actual new car mesh.
Without getting too into detail about bone assignments, I noticed the other ones are for the wheels which might be a little complicated to assign. But if you're following a tutorial about cars specifically, maybe it covers this.
5. Export the mesh, which hopefully isn't a cube abomination like mine, by selecting the s3asc file you imported and saving over it.
6. Back to S3PE, right click that same MLOD and Import from s3asc. 'Yes' to all the popups. You can repeat these steps on the MODL in the package, which is the distant LOD for the mesh, using a lower poly version of the mesh if you make one.
This package can be opened in TSRW if you want a preview or to continue editing in there- from Create New Project > New Import > change the file type on the drop down to .package. I also had to untick ‘preserve group ID’ for it to play well with the cubeomination I have created.
There she is, in all her glory.
If the rest of the tutorial you're following refers to TSRW, then it's just fine to continue from there after using the above method to replace the mesh- but also the general idea of doing it that way is that it allows you to avoid TSRW entirely. Useful if it's not playing well with a specific type of object, if you need it to be a default replacement, or if it plain just annoys you.
This is also entirely optional of course, do not feel obligated to do it this way if you figured out the TSRW import!
I'll repurpose this post into one of misc tutorials in the future, so it's fine for it to just be here as reference- and I'm getting great mileage out of this image.

1. Clone a car in S3OC. I chose one from Fast Lane Stuff because in a recent thread it seemed like the consensus was that they're easier to work with than base game cars.
2. Open package in S3PE, find the MLOD with the group number that is primarily zeroes, right click and export it to s3asc.
You'll need the Mesh Helper plugin for this to be available. All of the groups will be exported at once.
3. Open the exported file that ends with _filebase with Milkshape. I'm 90% sure even a trial version of Milkshape is fine for this, as the only purpose it will serve here is to convert a file- no need to save or load an actual project.
This requires another plugin- attached to this post, the one called msS3ObjPluginsV101. Drag and drop the contents of that download to the install folder of Milkshape.
Now I can see that Group 0 is the body of the car, Group 1 are the glass parts, and Group 2 are the headlights by clicking Hide on each one (then again to unhide).
Import > Wavefront OBJ > select the mesh you made in Blender. For my purposes, I just exported the default cube for this.
4. In the Joints tab, you can check what bone assignments the original has. Click 'SelAssigned' to see where it's being used, then 'SelUnassigned' to deselect. The 4th one down was the regular object bone for the body of the car.
Then I can 'Select' my goofy cube, click that bone, then 'Assign'.
Then back in the Groups tab, delete the original 'group00', give that name to my cube, and move it up to where the original was. For your purposes, you can do these same steps to replace all 3 pieces with the actual new car mesh.
Without getting too into detail about bone assignments, I noticed the other ones are for the wheels which might be a little complicated to assign. But if you're following a tutorial about cars specifically, maybe it covers this.
5. Export the mesh, which hopefully isn't a cube abomination like mine, by selecting the s3asc file you imported and saving over it.
6. Back to S3PE, right click that same MLOD and Import from s3asc. 'Yes' to all the popups. You can repeat these steps on the MODL in the package, which is the distant LOD for the mesh, using a lower poly version of the mesh if you make one.
This package can be opened in TSRW if you want a preview or to continue editing in there- from Create New Project > New Import > change the file type on the drop down to .package. I also had to untick ‘preserve group ID’ for it to play well with the cubeomination I have created.
There she is, in all her glory.
If the rest of the tutorial you're following refers to TSRW, then it's just fine to continue from there after using the above method to replace the mesh- but also the general idea of doing it that way is that it allows you to avoid TSRW entirely. Useful if it's not playing well with a specific type of object, if you need it to be a default replacement, or if it plain just annoys you.
This is also entirely optional of course, do not feel obligated to do it this way if you figured out the TSRW import!
I'll repurpose this post into one of misc tutorials in the future, so it's fine for it to just be here as reference- and I'm getting great mileage out of this image.
#11
29th Sep 2023 at 3:59 PM
Last edited by LadySmoks : 29th Sep 2023 at 5:52 PM.
29th Sep 2023 at 3:59 PM
Last edited by LadySmoks : 29th Sep 2023 at 5:52 PM.
Posts: 865
Quote: Originally posted by Chokovit
|
Thank you so much for your help! You have honestly been the most helpful out of everywhere I've gone haha. The tutorial I was using did tell me to import an OBJ to replace an EA mesh, apparently there was something about "grouping" I needed to do which I thought I did but the tutorial was a bit confusing about that part. I have attatched an image of what my .blend file looks like right now |
I have never done a car, but have worked with other objects in Blender and TSRW... statues, and a few other things. As @CardinalSims has said, when working with Sims objects, groups are generally a way to use different shaders in the same piece. They do not use enough bones for that to be an issue, as can be with garments. Cars will use phong for solid part, glass for objects (obviously for glass parts) and full bright for lights. Some may use a couple more phong groups for the car body.
You have already converted the model to .object, so THAT is out of the way. Personally, I find making a new multiplier that has any detail to be a bit of a PITA, and prefer to reuse textures from the model. Often, foreign models will have multiple images that must be squeezed to fit a single map to work in TS3. Hopefully, you have a single image, as determining which goe to what, then rearranging UV and textures is another issue.
My understanding is that base game cars do not clone properly. Not really sure. Many clone from Fast Lane. Also, I guess the speed of those cars is faster too.
In TSRW, open the donor you will clone. Go to mesh tab. In each group, you see "Default material" and "Material" to the right. Hover to the right side of "Material" and click the three dots. Newer TSRW will show which shader is used by that group.
(Car guys probably have a better way to do this, but... you can try this) Export the donor. When the window opens, change file type to wavefront object, and save. Import the object to Blender as groups (NOT as object). Import your mesh. Separate parts as body/ tires (phong), windows (glass), lights (full bright).
On the donor mesh, shrink group 0 UV and move it off of the grid, but where you can still get to it. Back to object mode. Join your group 0 to donor group 0. Be sure that your mesh jjoins the donor, and takes the donor's group name. In edit mode, select the donor UV only, and delete it... and the mesh. Your group 0 will now be recognized as group 0 in TSRW. Repeat this for all groups. Export object as groups. Import your new object to TSRW as wavefront object. Then replace textures.
Edit: Just to add, I imagine it to be important to match the tires/ wheels to the correct group for the animations of spinning and turns.
Shiny, happy people make me puke!
#12
1st Oct 2023 at 6:09 AM
1st Oct 2023 at 6:09 AM
Posts: 9
Thank you SO MUCH you guys! I've got a lotta work this weekend but I'm going to go through these on Monday-Tuesday
#13
3rd Oct 2023 at 6:42 AM
3rd Oct 2023 at 6:42 AM
Posts: 9
Woop woop! This is the farthest I've gone so far! Now from here I should be able to (hopefully) get the rest of this thing going. But if I need anymore help I know where to find it! Thanks so much you guys and thank you for this wonderful tutorial I would have never figured out this stuff alone LOL
#14
3rd Oct 2023 at 10:25 PM
Last edited by LadySmoks : 4th Oct 2023 at 3:27 PM.
3rd Oct 2023 at 10:25 PM
Last edited by LadySmoks : 4th Oct 2023 at 3:27 PM.
Posts: 865
Quote: Originally posted by Chokovit
| Woop woop! This is the farthest I've gone so far! Now from here I should be able to (hopefully) get the rest of this thing going. But if I need anymore help I know where to find it! Thanks so much you guys and thank you for this wonderful tutorial I would have never figured out this stuff alone LOL |
In case you do not already know, the shadow is usually just a single group. In Blender, join all groups as one, and use decimate to reduce poly count... usually by a lot. Remove interior parts completely, as long as the car shell remains. That way, your car's shadow matches the car. Shadow 2 can be more decimated, since it is seen from such a far distance that it does not need to match up perfectly.
FYI, something I made a while ago, I played with shadows. I made a statue of my Lucifera Morningstar (female Devil)... actually 2 statues. One statue had the shadow with the demon wings, like the statue. The 2nd statue cast a shadow of angel's wings and a halo!
Shiny, happy people make me puke!
#15
7th Oct 2023 at 8:09 PM
7th Oct 2023 at 8:09 PM
Posts: 82
Thanks: 213 in 4 Posts
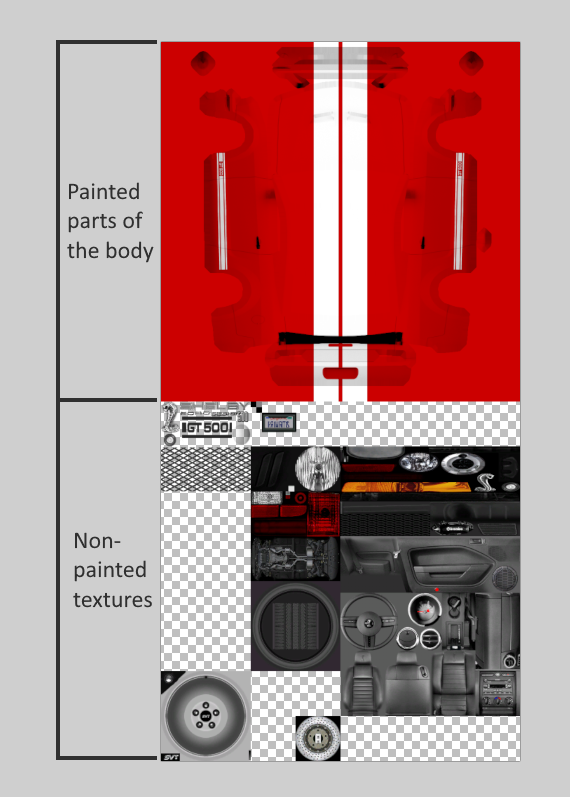
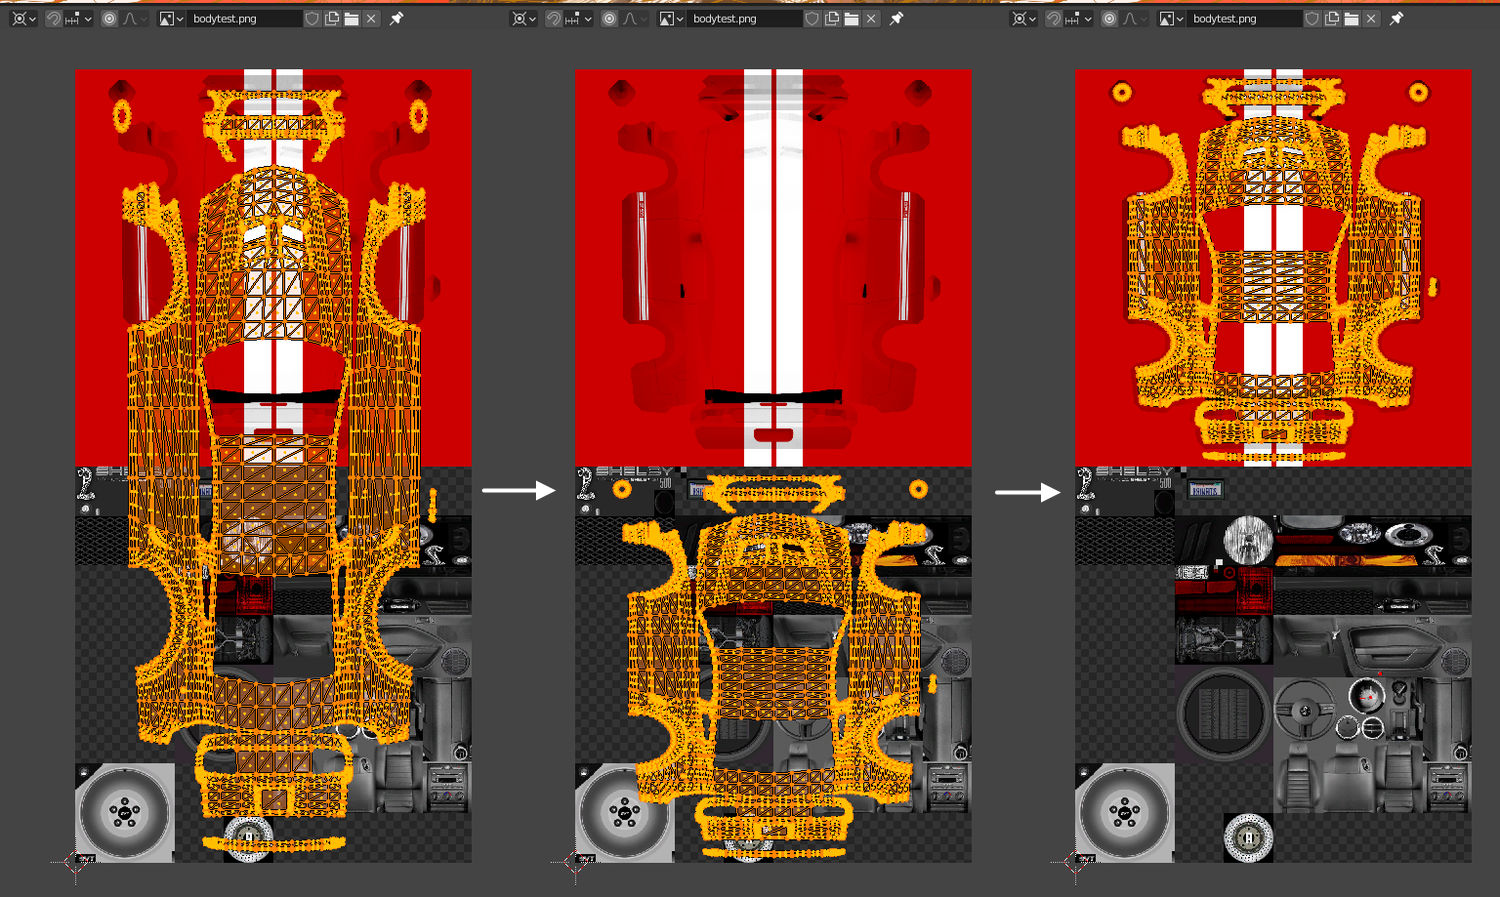
Hello! Yeah in regards to the UV mapping, it's definitely one of the most tedious parts with porting vehicles from other games. My approach is to start planning what the final combined texture will look like. With my projects I use a 1024 x 2048 texture. The painted parts of the body take up the top half of the texture, then the bottom half is for details like the interior, badging, tires and wheels etc.
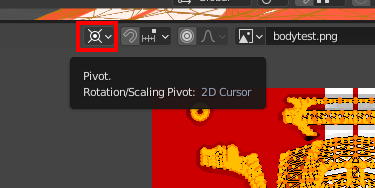
When you are happy with the texture, you can make a test-texture for blender to help when moving around the polygons/uv islands. When you're using the UV Editor, set your pivot to the 2D cursor, and scale and move in increments of 0.5, 0.25, 0.125 and 0.0625. Also press X or Y to lock the moving/scaling direction. The UV Sync Selection option is also handy if you want to select certain parts of your mesh that you want to detach.
As for the wheels, I haven't run into any problems with Fast Lane vehicles when I give the wheels their own mesh group separate from the body. It is handier when adding the bone assignments because you can hide the other object groups while doing it. Like what CardinalSims mentioned you can check the bone assignments of the original vehicle you cloned and take note of the ones for the wheels. Then when you import the Picador's wheels, use the select tool from the model tab to select each wheel from the top orthographic view and assign it to its respective bone.

So I hope that makes sense, the UV editor is tricky to get used to, but with practice you should get the hang of it.
When you are happy with the texture, you can make a test-texture for blender to help when moving around the polygons/uv islands. When you're using the UV Editor, set your pivot to the 2D cursor, and scale and move in increments of 0.5, 0.25, 0.125 and 0.0625. Also press X or Y to lock the moving/scaling direction. The UV Sync Selection option is also handy if you want to select certain parts of your mesh that you want to detach.
As for the wheels, I haven't run into any problems with Fast Lane vehicles when I give the wheels their own mesh group separate from the body. It is handier when adding the bone assignments because you can hide the other object groups while doing it. Like what CardinalSims mentioned you can check the bone assignments of the original vehicle you cloned and take note of the ones for the wheels. Then when you import the Picador's wheels, use the select tool from the model tab to select each wheel from the top orthographic view and assign it to its respective bone.
So I hope that makes sense, the UV editor is tricky to get used to, but with practice you should get the hang of it.
#16
8th Oct 2023 at 4:13 AM
8th Oct 2023 at 4:13 AM
Posts: 9
Thank you so much!!!
#17
9th Oct 2023 at 6:15 AM
9th Oct 2023 at 6:15 AM
Posts: 9
Quote: Originally posted by speedo10
|
As for the wheels, I haven't run into any problems with Fast Lane vehicles when I give the wheels their own mesh group separate from the body. |
Hmmmm for some reason it looks like it doesn't like me making the wheels their own mesh group. I've added each wheel to it's respective joint but now I can't really figure out how to group them all together with the body again. Here is the error I'm getting.
Also, I did try just ignoring the error and seeing if it was one of those "notification" type things that doesn't actually cancel the export, but it does actually cancel the export.
EDIT: Nevermind! I figured it out
First in the "group" tab I hid group01 and group02 (i.e. the glass and the lights). This left only group00 (the body) and all my wheel groups together. Than I drew a selection marquee over everything visible and hit the "regroup" button. This consolidated the whole selection into a new group which could than be renamed to "group00" and moved back up at the top again. I need to get more confident with just pushing buttons to make things happen :P
#18
9th Oct 2023 at 8:24 PM
9th Oct 2023 at 8:24 PM
Posts: 82
Thanks: 213 in 4 Posts
Quote: Originally posted by Chokovit
|
Hmmmm for some reason it looks like it doesn't like me making the wheels their own mesh group. I've added each wheel to it's respective joint but now I can't really figure out how to group them all together with the body again. Here is the error I'm getting. Also, I did try just ignoring the error and seeing if it was one of those "notification" type things that doesn't actually cancel the export, but it does actually cancel the export. EDIT: Nevermind! I figured it out First in the "group" tab I hid group01 and group02 (i.e. the glass and the lights). This left only group00 (the body) and all my wheel groups together. Than I drew a selection marquee over everything visible and hit the "regroup" button. This consolidated the whole selection into a new group which could than be renamed to "group00" and moved back up at the top again. I need to get more confident with just pushing buttons to make things happen :P |
Nice one, glad you figured it out.
Who Posted
|
|