 Sign in to Mod The Sims
- Site Map >
- Modding and Creation >
- Sims 3 Creation >
- Object Creation >
- Texturing/Tiling - Making CAS castable vs making OBJ castable?
- Site Map >
- Modding and Creation >
- Sims 3 Creation >
- Object Creation >
- Texturing/Tiling - Making CAS castable vs making OBJ castable?
Replies: 4 (Who?), Viewed: 308 times.
#1
 29th Dec 2023 at 5:59 PM
29th Dec 2023 at 5:59 PM
Posts: 65
I am looking for a good tutorial on how to make something that is castable in game. So far the tutorials I've found have all been for CAS items. Would that advice be transferable to the process of making a mask to recolor an object? I would really prefer a good written tutorial as sometimes they go too fast on YouTube or the narration is not completely clear. I am not casting aspersions on the folks who are kind enough to make YouTube tutorials, but I guess I have developed "old fart" hearing and sometimes YouTube is less than cooperative when I keep saying "Wait. Back up and go through that again."
Thanks in advance.
Advertisement
#2
29th Dec 2023 at 10:46 PM
29th Dec 2023 at 10:46 PM
Posts: 484
Thanks: 10 in 2 Posts
The concept is generally the same, yes.
EA uses different colours for CASP and OBJ masks, but in practice they can be interchangeable. If in doubt, use what the cloned object's mask is using.
Most objects use up to three channels, defined by RGB colours read from the Mask texture. Pattern A will apply to RGB Red (ff0000), Pattern B to RGB Green (00ff00), so on. Those colours are available from the swatches tab in Photoshop, not sure about other image editing software.
A fourth channel can be enabled that uses the Alpha channel, the part that is usually for transparency in other textures. On EA textures this often shows as an orange section on the mask- if you uncheck Alpha in S3PE when viewing such a texture it you will be able to see the RGB parts.
You can open an existing Mask if you want to sample the colours, as they do need to be exact.
I open the texture for the object and apply the colours on new layers. If you aren't sure what on what parts of the texture correspond to what, it can help to check the UV map in Blender or even export it to see where the mesh lays.
When you check the Channels, you should see that they are each perfectly black and white. White representing the presence of that colour and black representing an absence. This is what a Mask I made yesterday looks like in Photoshop:

The image then needs to be saved in .dds format. GIMP can do this by default, Photoshop needs a plugin.
If it's a three channel mask, it can be saved with DXT1 compression. If it's four, it needs to be DXT5 with alpha.
The multiplier for the object also needs to be greyscale, of course. You may want to adjust the contrast if you find that it recolours too dark or light.
The Overlay texture will ignore the mask and apply itself on top with its original colouration.
I can take screenshots of any of the other steps, I just wasn't sure how much you had already read on the process
Scribe of tutorials. Oracle of questions at NRaas. Blog staller at thecardinalsims. Feel free to @ me for input on any TS3/TS4 modding questions.
EA uses different colours for CASP and OBJ masks, but in practice they can be interchangeable. If in doubt, use what the cloned object's mask is using.
Most objects use up to three channels, defined by RGB colours read from the Mask texture. Pattern A will apply to RGB Red (ff0000), Pattern B to RGB Green (00ff00), so on. Those colours are available from the swatches tab in Photoshop, not sure about other image editing software.
A fourth channel can be enabled that uses the Alpha channel, the part that is usually for transparency in other textures. On EA textures this often shows as an orange section on the mask- if you uncheck Alpha in S3PE when viewing such a texture it you will be able to see the RGB parts.
You can open an existing Mask if you want to sample the colours, as they do need to be exact.
I open the texture for the object and apply the colours on new layers. If you aren't sure what on what parts of the texture correspond to what, it can help to check the UV map in Blender or even export it to see where the mesh lays.
When you check the Channels, you should see that they are each perfectly black and white. White representing the presence of that colour and black representing an absence. This is what a Mask I made yesterday looks like in Photoshop:
The image then needs to be saved in .dds format. GIMP can do this by default, Photoshop needs a plugin.
If it's a three channel mask, it can be saved with DXT1 compression. If it's four, it needs to be DXT5 with alpha.
The multiplier for the object also needs to be greyscale, of course. You may want to adjust the contrast if you find that it recolours too dark or light.
The Overlay texture will ignore the mask and apply itself on top with its original colouration.
I can take screenshots of any of the other steps, I just wasn't sure how much you had already read on the process

Scribe of tutorials. Oracle of questions at NRaas. Blog staller at thecardinalsims. Feel free to @ me for input on any TS3/TS4 modding questions.
#3
31st Dec 2023 at 9:03 PM
31st Dec 2023 at 9:03 PM
Posts: 65
Quote: Originally posted by CardinalSims
|
The concept is generally the same, yes. EA uses different colours for CASP and OBJ masks, but in practice they can be interchangeable. If in doubt, use what the cloned object's mask is using. I can take screenshots of any of the other steps, I just wasn't sure how much you had already read on the process
|
This is very helpful. Thank you so much
I hate to admit this, but after a few hours of Blender and trying to figure out GIMP, I think I may need to table this whole making CC adventure until I revisit cataract surgery with my ophthalmologist. At some point Blender might become less confusing, but the visibility on grey on grey is going to require an intervention.
#4
31st Dec 2023 at 10:59 PM
31st Dec 2023 at 10:59 PM
Posts: 484
Thanks: 10 in 2 Posts
If it helps at all, in Blender's Preferences (which, depending on the version is either under the File menu or the Edit menu), there is a Themes section where every colour for the interface is individually customisable.
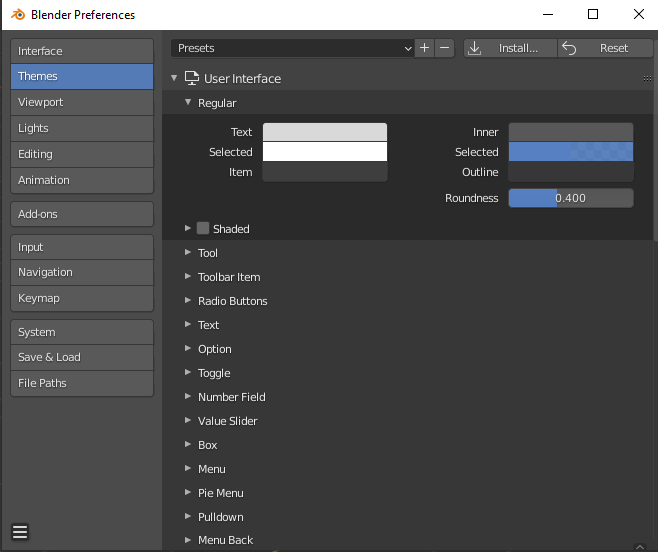
There are some inbuilt presets you can look through, and if none of those are to your liking you can also download more online and install them.
There are some inbuilt presets you can look through, and if none of those are to your liking you can also download more online and install them.
#5
1st Jan 2024 at 6:46 PM
1st Jan 2024 at 6:46 PM
Posts: 865
Wanted to say, be wary of using dxt1 for masks in GIMP, if you are marking any sort of detail lines, or curved parts on the mesh/ multiplier, as dxt1 will create artifacts. Photoshop may be different results? Sharp edges are fine at dxt1, as when the mesh UV parts are separated. I will use it for those situations.
Shiny, happy people make me puke!
Shiny, happy people make me puke!
Who Posted
|
|